
770-943-2265
Nation-Wide
Registered GOV Contractor
Dunns #06755458
Goods & Service Codes
NAICS 321992 SIC 3448
PSC 5410 FSC 5410
37+ Years
Introduction:
Hi, my name is Bryan, I do grading and I install concrete for Superior Buildings and Carports, Inc. I hold a class A CDL and I move Superior's heavy machinery and large dumps trucks. Most of my time is spent running heavy equipment "grading" and pouring concrete. Superior asked me to write an article about "How to hire a concrete contractor" and "How to install a concrete slab". Covering the basis for hiring a contractor is easy but, I was not so sure that I wanted to give away my secrets about slab work, not to mention that I am not even close to being a writer. ...hem... Learning how to put in a concrete slab correctly has taken me years of hard work, a lot of sweat, and even a little blood. As, I thought about this, the more I realized that I wished that someone would have taught me this stuff when I started. I went to work with a concrete crew and I learned this the hard way at work. I am providing this information free of charge for Superiors customers.
This page was written by me and all information provided on this page is based on jobs that I have completed or have direct knowledge of. The information provided here, could help your concrete slab turn out better and might even prevent you from making a mistake. Superior does not warranty the information provided here and your use of this information is at your own risk. This is provided as a FREE educational guide. Use of any information on this page should be verified by a local builder or concrete contractor BEFORE being used. Now that the legal stuff is over, lets get back to buildings and concrete.
Buying and building a sound building can be tricky if you don't know what to look for. Some companies and builders will sell you the lowest price and the lowest quality building, cutting every feature that can be cut, from thin concrete all the way to a cheap roof design. Everyone wants the lowest price on the job, but at what later cost? Some customers do not know the different product types that are sold and base the buying decision on the price. Your building should be made with the correct roof options, construction and in the correct size to serve you well in the coming years. Getting a big enough building is important. The contractors that build the building can make a major difference to.
Cover yourself when shopping for a building. If you are talking to a salesman about a building, ask in depth questions on what experience they have and what is included in your building package. Don't just get a price. Dig a little deeper. Ask if they provide grading and concrete work in their area. We all know a building starts from the ground up. These type of companies may have a better understanding and might know more about how to build a building and slab.
This may come as a surprise but there are MANY websites that sell buildings, that CAN NOT actually build the product, themselves much less provide the grading and building foundation. We are unlike most all other companies, We specialize in grading and concrete work. And when I say that I do not mean that we sub out the work. We really do it. We are THE one stop shop. Many companies that do provide concrete work, do it close to home because it is too costly to haul heavy machinery around the country. Most all building kits are designed for shipping, so ordering a building from 500 miles away is not a problem. If you decide that you need help on your concrete work, we work mostly in North Georgia only. We will fly or drive long distances to help with a slab for an extra fee. I love to hunt and fish and I am always looking for adventure.
Hiring a grading and concrete contractor.
A good concrete slab will give you years of HAPPY use. A concrete slab that breaks up, has water issues or is not leveled correctly will frustrate you to the point of wanting to redo it. You probably already know that it is very hard to change out the concrete if a building is sitting on it. If you hire a contractor to build your concrete slab, make sure it is not a fly by night guy that is renting a machine. It is OK to rent a machine. The point is, if he has nothing, once he gets your money he has nothing to lose. You can lose your money and time. Lets assume they know how to do the work correctly. If you take a chance with an unknown contractor, the safest way to protect your money while work is being done is to:
- Pay for the work in stages, part for grading, part for forming and the last part for pouring.
- Pay the concrete company that delivers the concrete direct. This will prevent paying for the concrete twice if the contractor does not pay for the mix. Or ask him what company he uses and then write him a check made out to them. You can also call the concrete company and ask if his account is in good standing. This is cheap insurance.**
- Use a tape measure on the day of the pour and check the thickness of the pour, it is easy to cheat $100's on a job if your pour is thin.
*Don't forget that some times cost come up that are not in your quote, rocks, soft dirt, trash in the ground, concrete piers, etc.
**If the contractor has a business and a store location this should be taken in to account. The more stable the business the less chance you will have a problem. It is always safest to pay for any type of building material delivered to your location, directly to the supplier that delivers it. Many people have had to pay for their house building packages, TWICE. The contractor pockets the money he was given and does not pay for the materials, then later, a lean is placed on your property by the supply company. To clear the lean, you will have to pay for the materials again. I personally have learned this the hard way. I went to court and did not recover any of my lost money. Court is a waste of time, so protect yourself before you get sucked into that.
Concrete Piers: If a concrete footing or concrete slab is out of the budget, another way that you can level out a building or carport is with concrete piers.

Do it yourself - Concrete Slab
If you decide to Do it yourself, putting in your own concrete slab can save you money. While reading through this, pay close attention to my advice on water control. Concrete work is a very physically demanding type of work. You need to be strong enough to move a lot of weight in a short amount of time. Putting in a driveway is much easier than a building slab. To put in a building slab you must have an eye for keeping the concrete level and square. We will discuss how to grade your location and build a concrete slab below.
Q: I want to save money. Can I just put my garage on my existing concrete driveway? A: If the concrete is fairly level you could. It would not have footing's under the edges which would not meet inspection if inspected. Footing's add at least 25 - 40% more to the cost of the concrete slab. Also, keep in mind a garage is built based on right angles and straight lines. If your concrete has a slope left to right the garage door will a have gap in the bottom corner that can't be easily fixed. For the best installation we recommend starting fresh either on new ground or removing the old driveway.
Facts about concrete.
- Concrete weights about 150 lbs per square foot.
- 27 square feet in one yard of concrete = About 3500 - 4000 lbs per yard.
- Concrete trucks can carry 9 to 12 yards = About 31,000 to 48,000 lbs of concrete per load.
- Figuring your concrete is easy. Take width*length then / by 81 = This will give you the yards for a 4" slab
I have went ahead and did some basic math for common size carports and building slabs. Concrete needed for a 4" Concrete Slab. For "Perfect Grade":
- 12' x 20' slab = 240 sq ft = 3 yards
- 18' x 20' slab = 360 sq ft = 5 yards
- 18' x 30' slab = 540 sq ft = 7 yards
- 24' x 25' slab = 600 sq ft = 8 yards
- 24' x 30' slab = 720 sq ft = 9 yards
- 24' x 40' slab = 960 sq ft = 12 yards
- 30' x 40' slab = 1200 sq ft = 15 yards
- 30' x 50' slab = 1500 sq ft = 19 yards
Concrete needed for a 12" x 12" footing under slab:
- 12' x 20' footing = 64 lin ft = 2.5 yards
- 18' x 20' footing = 76 lin ft = 3 yards
- 18' x 30' footing = 97 lin ft = 4 yards
- 24' x 25' footing = 98 lin ft = 4.25 yards
- 24' x 30' footing = 108 lin ft = 4.5 yards
- 24' x 40' footing = 128 lin ft = 5 yards
- 30' x 40' footing = 140 lin ft = 5.5 yards
- 30' x 50' footing = 160 lin ft = 6.25 yards
If you are planning to do a building pad for yourself, I recommend at least 2 helpers per truck and you all must be in good shape. Concrete must be spread, then smoothed, then finished, all within a short window of time. The hotter the day the faster it will dry and the more help you will need. In this how to guide, I will explain how to make a concrete slab and a good building site. A building starts with the foundation and goes up. We will talk about the building area and grade first.
Picking your building location:
In some cases you can only build in one area due to room and yard space requirements. In other cases customers will have plenty of space and can select the correct area for the building. In construction, water control is the one most important item that can separate a good builder from a bad builder. If you can't control drainage around your building you will have problems. When we help customer's select their building location, we look at several things.
- Property line's and set backs.
- Access to the building.
- Septic fields.
- Soil conditions.
- Grade and water control.
1. Setbacks - Most areas require a building to be set back from the property line. Call your zoning department and ask what you need. How much depends on the size of the building you build and the zoning of the property. Common set backs are 10 feet from the sides, 35' from the rear and 35 feet from the front line. Larger buildings can require more set back and your properties zoning can require more or less set back. And here lately set backs and permitting cost have been growing. In the good ole days of the past, side set backs were 5' and rear setbacks were 10' feet. Cobb County, Georgia has a new 100' set back rule, from all property lines for buildings over 650 sq ft. They will allow you to apply for a variance "at a $250.00 fee" and you will wait for the "zoning board to meet" to determine what you get to do. Most of the time they are easy to work with. So, don't give up and remember the squeaky wheel gets the grease. To recap call your local building permit office, speak to zoning and ask how far your building must sit back from the lines and where it can be put based on your house location. Some areas want the building to be behind the house. Most all areas have the set back requirements due to fire code rules. Space helps to stop fires from spreading. But the last time I checked metal buildings and concrete do not burn well.
2. Access to your building - Using an existing entrance or driveway for your carport or building can help reduce costs. Having the building in a good area that is convenient will provide more satisfaction. If you are planning to have power in the building the further the building is from power the more it will cost to get power in it.
3. Septic fields - Make sure the concrete does not go on top of your septic field or septic tank if you have one. In some cases customers will place a drive way over a field line. This normally does not hurt the drainage but it will need to be removed when you need to work on the field lines. *Extra costs later. The county says that the driveway can not come with in 10' of the new field. When you apply for a permit you also must apply for a septic inspection. Normally the government has a map of where your tank and field lines were placed. They send someone out to make sure the area is not damp/wet from a full field. If you have wetness around the field they will make you repair and/or replace the field line before you get a building permit. This could cost from $3000.00 to $6000.00. If a repair is required they no longer allow a perk test. You must hire a geo surveying firm to see what kind of dirt you have and if it will support another field line or repair. The county inspector will look at this and tell you what you must do. The dirt inspection firm runs about $350.00 for their survey/letter and the county inspector gets $100.00 for their inspection. If your dirt is bad and you are required to put in a pump around the yard system it will cost a lot of money to fix the septic. If you are limited on space the county will not allow you to put a building over the lines or tank. It has been done in the past but they will not approve it. This is because the average person can not afford to remove a building and or concrete to repair the septic. Consider buying a portable shed for that area so that it can be easly moved.
4. Soil Conditions - Pick an area that has firm soil. If possible top soil should be removed from under the concrete slab. Grade down to good solid dirt.
5. Grade and water control - When locating your concrete slab spot, pay attention to how and where the water in the area around your building will go to. We do not recommend placing your concrete slab in a low area that can flood or could be in the way of ground water run off. Concrete slabs are normally flat. If you want to be able to keep the garage door(s) open in a rain storm make the back of the slab 2" higher and have the concrete slope towards the garage doors. This will prevent water from running into the garage if the doors are open during rain.
Grading and leveling the area for your building.
Once the building location and size is determined, we level the area with a skid loader or bobcat. If space is available we grade at least 6' to each side, 6' to the back and 10' in the front. So if we were going to build a 20' wide x 30' long building, we would grade an area at least 32' wide x 46' long. The extra area that is graded is for drainage around the building. Grading for the building is very important. Do not put the slab right on the edge of a drop off in the grade. Dirt can wash out from under the slab. We insure that the slab is higher than the surrounding area. We then use the surrounding area to help water flow away from the building. Hire someone that is experienced at doing it or take your time and do not cut corners.
We use a transit to shoot the grade. A transit is a level that you look through. It allows you to view over an area on a level plane. You then use a tape measure or a story pole to check the grade. The numbers work opposite of what you think. If 4' is your grade level then 4'2" means that you are 2" low. If your measurement is 3'8" then you are 4" high. Either rent or buy a transit to build your slab. We just use the old type that you look through. Now they have units that project a laser in a 360* circle. You can walk around your area with a laser reader and tell what the grade is. Either unit works fine. I use the old type because it always works. It takes longer and is slow to do alone. It is much easier to do with a helper, one guy to look and read and the other to move the story pole around. The new style allows you to do it by yourself with out walking back to the transit to read the stick. The new style can be a real pain in the rear on a bright sunny day. I had a bad experience once on a sunny day with the new type. We had problems getting it to project correctly. It cost me a day so I went back to old school and have not had a problem since and I do not have to keep up with batteries..
Getting the grade correct is very important. Each inch you are off is 25% more concrete that will be needed or you must move dirt back in or out after the forms are set. Getting it close first will save you a lot of hand work later. I can get the grade done using the loader to within .75" on large jobs, if I am using my Case skid loader. I really know the machine. We then finish the grade by hand after the forms are set. In order to get it that close, you must know how to finish grade with your skid loader. If you are off inches it will cost you hours to fix it after the set. GET THE GRADE AS CLOSE TO PERFECT AS POSSIBLE.
Choosing a slab thickness:
Most residential concrete slabs are about 4" thick. The instructions here are for 4" slabs using 2 x 4 form boards. If you want a thicker slab just use wider forms. 2 x 6's, 2 x 8's or 2 x 10's. Consider the weight of what is going on the concrete before you build the concrete slab. Don' forget to add a few thousand pounds for the building. You can also use larger form boards to help with the footing if needed. Some areas require form boards to be 2 x 8's or larger ask your building inspector to find out what he wants. Try to use the longest straightest boards you can get. Pick through your lumber at the store. Do not buy curvy, heavy crowned or bent boards. If the dirt the concrete is going on is bad make the concrete a little thicker for more strength.
- 4" - 2 x 4 forms - Good for cars / light trucks / DO NOT use rebar in slab - use 6 x 6 wire or fiber - up to 10,000 lbs or so.
- 6" - 2 x 6 forms - Good for heavy trucks / commercial use / #3 rebar can be used - 40,000 lbs or so.
- 8" - 2 x 8 forms - Good for heavy fork lifts with narrow tires / Heavy RVs / needs rebar - 50,000 lbs +.
- 10" - 2 x 10 forms - Good for loaded tractor trailer's / extreme weight / needs rebar - 80,000 lbs +.
Getting ready to set the concrete slab forms:
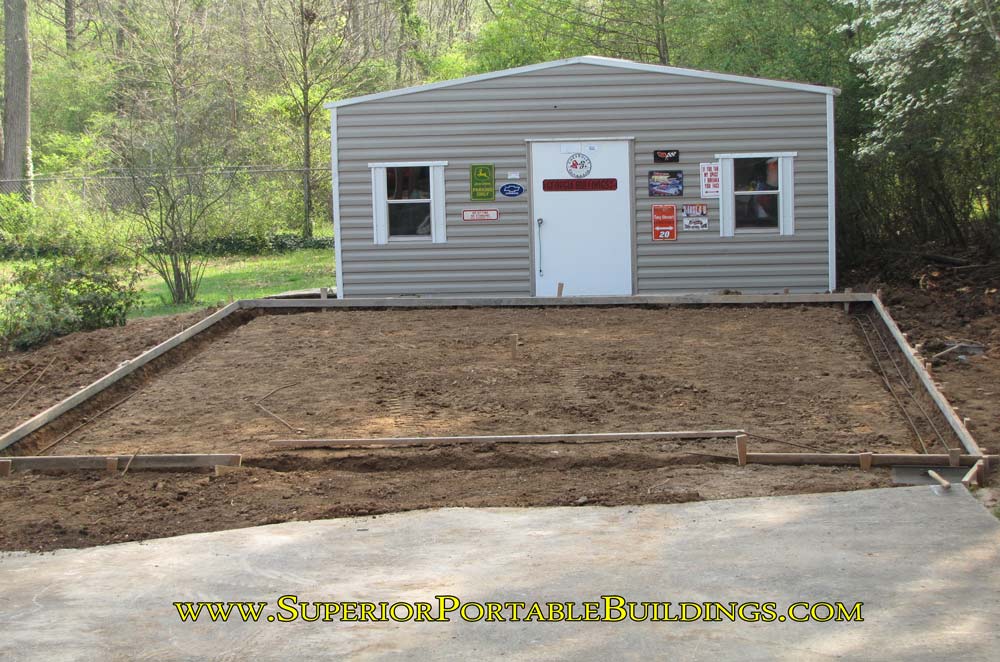
After the basic grading is done, we set and square 4 corner stakes. We lightly beat them into the ground with a hammer and set the width and length. Most slabs are built about 3" bigger than the building. So a 20' wide by 30' long building gets a 20'3" by 30'3" slab not including the ramp. We make the slabs bigger by 3"s for a few reasons. Look for the footing drawing a little further below.
- Strength: An extra 3" of concrete outside the building's width and length for strength when installing expanding concrete anchors.
- Error: A slight margin for error on slab squareness to building squareness.
- Protection: A little extra concrete to help keep grass and trees from growing up into the building.
Some people go extreme and add extra feet of concrete around the building. This can catch water and send it towards the building if not sloped away. Make sure the footings stay under the buildings frame. Personally I like exact sized concrete with a step down notch. This is much more expensive than a normal slab. Building a slab and presetting the building anchors is very hard to do with these type buildings. So leave the preset anchors out.
Setting the corner stakes right can be a pain in the rear if you don't know how. All corners must be right angles. You can use the old 3,4,5 carpenter trick off the first corner or you can measure out the widths and lengths and then check your diagonal corner measurements with a 100' tape measure. When the diagonal measurements are the same number your stakes are square. If one diagonal measurement is longer than the other. You have an offset parallelogram going. You need to move one side forward or backward to get right angles on the corners. This can be a PITA if you are trying to line the building up with an existing house or fence. You must get this down perfect. With trail and error you will get it right.
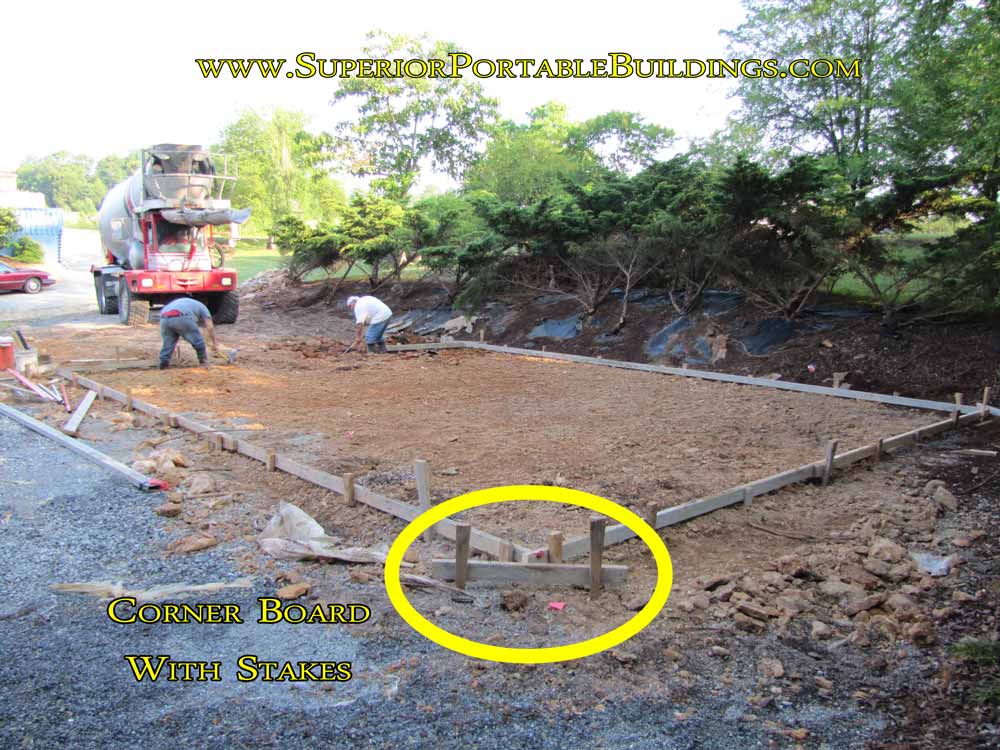
After the stakes and basic grading are done, you need to set your corner boards and put level marks on the corner board stakes. Use 4 - 3' or so 2 x 4 boards, set on a 45* angle, about 4 inches out side and OFF each corner stake. The boards are set facing the opposite corner. The reason you set the corners boards about 4" off the stakes is to have room to set your form boards AFTER you run your string lines. The corner boards are used to set and hold your mason string lines for each side of the slab. The boards are set on a 45* so that you can move your strings in and out to get the square perfect. Each corner board is held on the ground with a wood stake. 2 long stakes per board. We cut our own stakes out of scrap 2 x 4 boards. Mock the corner board up and then knock your stakes into the ground so that they are right beside and outside the corner boards. You will nail the corner boards to the stakes later.
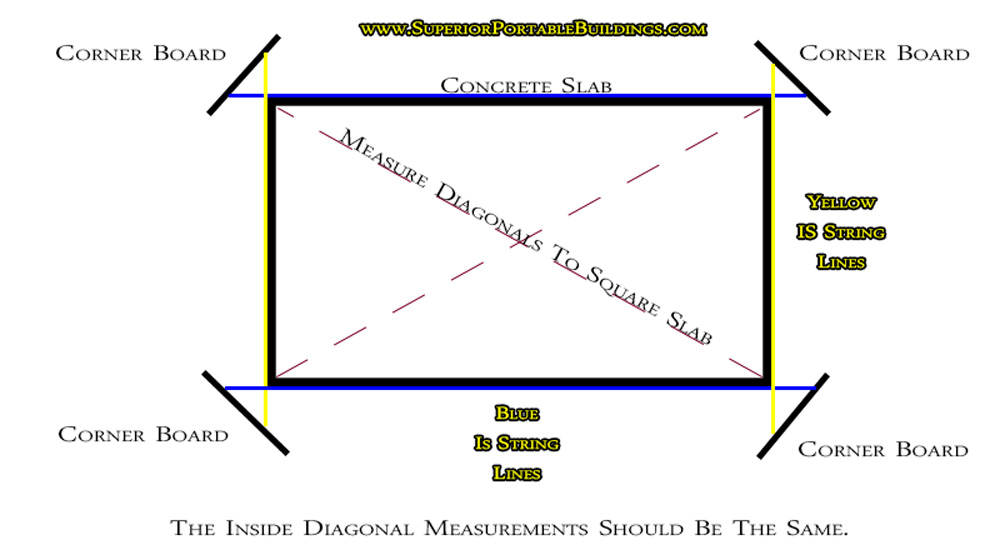
After the corner board stakes are set, you must put level marks on the corner board stakes. Use the transit to mark the stakes. Go around about 3.5" above the grade level and mark each stake using the same spot on your tape or story pole. Make sure the mark is about 3.5" to 4" above the ground. This will give you room to set in the form boards after the string lines are placed and squared. If you use a larger form board for thicker concrete give yourself more room. The corner boards are nailed to the stakes and the level marks are where the top of the corner board lines up. When using the transit to mark the boards, one person reads the level and while the other person uses a story pole and a pencil to put a mark on each corner board stake, every stake gets the level mark. After all 8 stakes are marked, nail the corner boards to the stakes using the mark on each stake to line up the top of the corner board (two stakes per corner board, one on each side of the board). The 4 corner boards are now all leveled and in the correct area to start squaring the mason's string. This sounds simple, it is very important that you get them even. This is what controls the level of the whole building. This is the top of the concrete slab. If your boards are too high or low you will be adding dirt or taking away dirt later. Save yourself extra work later and get them in the right spot.
Mason string: Use your corner stakes as a guide and run your masons string around the perimeter of where the building is going. Put 2 nails on each corner board to hold each string end. One nail for the end of each wall. The strings will cross each other at the buildings corner about 5" or 8" inside the corner boards. You can move the strings independent of each other. You will need to square the strings. This can be the hardest part of the process if you did not follow my other instructions. Start by making the widths right, then the lengths. Check the square. If out of square you will need to measure how far out. Say it is 10" long comparing the diagonal measurements. You will need to move the string on either a front wall or side wall 5" in the same direction. You should already be close since we squared the slab to begin with. Normally at this point the square is only out 2" to 3" inches. If you placed your corner boards correctly you will have enough board to fine tune the lines. If not you will need to move and reinstall the corner boards. Re-check square. We just use a tape measure and put a pencil mark on the string, we then move the nail and align the string to the pencil mark on the string. Keep moving it until it is right. If your square gets further out, then move the stings the opposite way. Make sure your sting lines are pulled tight just to the point of breaking with out breaking it. You should have some nice square level lines.
Setting the concrete forms: If you have made it this far you are almost there. The lines mark where to put your form boards. If you were smart you made sure the lines were about 4" higher than the dirt grade. If you don't have 4 inches it is time to add or remove dirt. Put 2 x 4s around the perimeter on the outside of the masons string. Keep the boards level and in-line with the string. Use a wood stake about every 4 to 5 feet. Mock up the forms, then beat a stake in the ground, nail the form to the stake at the right height. The string is the top of the board. If the board does not fit under the string you will need to shovel it down so that it does fit. Continue around the outside. Leave an opening where the concrete truck is coming in. Normally about 10' wide. The forms are set and leveled. Great Job.
Checking Slab thickness: Check your slab thickness by running more lines across the forms right across the middle of the slab. Measure down with a tape measure. Fix the low and high spots by adding or removing dirt/gravel. If the line is 2" from the ground you are in for a long day. Have fun digging or dragging the dirt out. If you are a really good bobcat operator you can fix it with the machine. If you run into the forms you just ruined all your form work so BE CAREFUL. Save the last few feet for a shovel. Get the thickness you want. Every inch you are off can add YARDS more concrete. GET IT RIGHT.
Footings: We normally check the thickness of the slab and put the dirt from the footings back into low areas. If the slab depth is good we use the dirt from the footings to fill in around the slabs outside perimeter. The footing is dug around the perimeter of the building. It is supposed to go deeper than your frost line. The colder it gets where you are the deeper the footing is. Around my parts it is a 12" x 12" footing. So the outside edge thickness of the concrete is 12". Some areas want 3' deep footings. If you need deep footings consider renting an excavator. Be careful not to hit the forms. On most jobs we dig them with shovels. You can use the dirt from the footings right around the outside of the building slab to add a little more dirt around the edge.
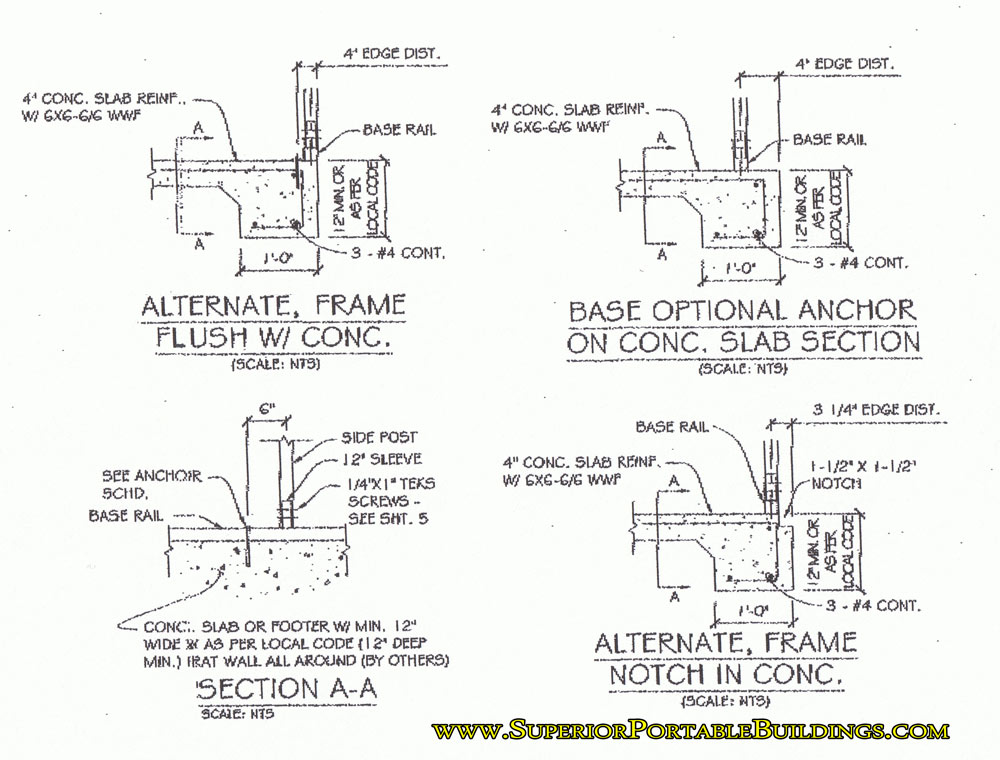
Rebar: We put two pieces of 1/2" rebar in the footing about 3"s off the dirt floor. You can put a 3rd piece higher up in the footing if you would like, keep it 5.5 to 6 inches from the surface. Home depot has some metal chairs that you can buy to help hold the rebar up. Or you can cut some short pieces of rebar and drive it down in the ground with a hammer and tie the rebar to each stub that sticks up. You need to keep the rebar close to the bottom but not on the ground. It makes your footings a lot stronger. Concrete is weak in contraction and strong in compression. The rebar helps stop contraction on the lower part of the concrete which is what occurs when weight is placed on your slab. The top of the slab is in compression when weight is on it.
Vapor barrier and gravel base. A vapor barrier is plastic sheeting that is laid on the ground right under the concrete. Home depot has a heavy duty 6 mil plastic that is about $120.00 a roll if you want it. It is supposed to help with moisture. Most of the time the concrete trucks tear it up when they drive on it. Lord help you if you need to carry the concrete in with a loader. It is a real PITA if you try to roll it out as you pour, in some cases impossible. Some builders want 2" of gravel under the concrete. The idea behind the gravel is that it is supposed to move in and fill a low area if the slab starts to sink. It seems like it mostly does not work but some areas require it. I think that pouring on good hard, dry dirt is the most important thing for long lasting concrete.
Sand: DONT USE IT. Some concrete guys will get a load of sand to dump on a wet area of dirt on the day of the pour. Don't ever mess with sand. 20 years down the road that concrete will break up. Wait till a dry day.
Electrical connections: Some areas require a 20' piece of rebar to be laid into the footing with about a 4' piece left sticking up out of the slab for a panel ground to be attached to. "Anode Ground". Plastic pipes for wiring should be laid under the concrete before the concrete is poured. Most use a 2" pipe with a long sweep elbow on the bottom corner for the electrical service wire to enter if coming from the house panel. If a service meter base is going on the outside of the building, you can run the pipe up the outside of the building and then straight through the wall to the panel, if it done this way, you will not need a pipe for a service wire through the floor. Most power companies require the meter base to be inspected so keep this in mind if you were considering not getting a permit. You can avoid this if you run a service wire off your house panel. Welders and such need at least a 60 amp breaker, so check to make sure of your house panel breaker space.
Plumbing: I like to run all drains with 4" PVC. I use 3/4" CPVC for supply lines. If the supply lines are going under the concrete, I make sure they are at least 18" under the dirt. This will help prevent them from freezing. You can also run them up the outside of the buildings wall and insulate them. If they break or burst it is easy to get to and fix later. Galvanized steel pipe is a good option for water faucets, it is harder to break if jerked on. The less that is under the slab the less problems you will have later. It is a big pain to fix a water line that is broken under the concrete. I have been to jobs where house service lines break under the slab, try cutting a slab of concrete inside a finished living area to replace a water line. It is a mess.
Did you know that well water will corrode and ruin copper plumbing! So be careful if you are using a well and copper to run agua in your building.
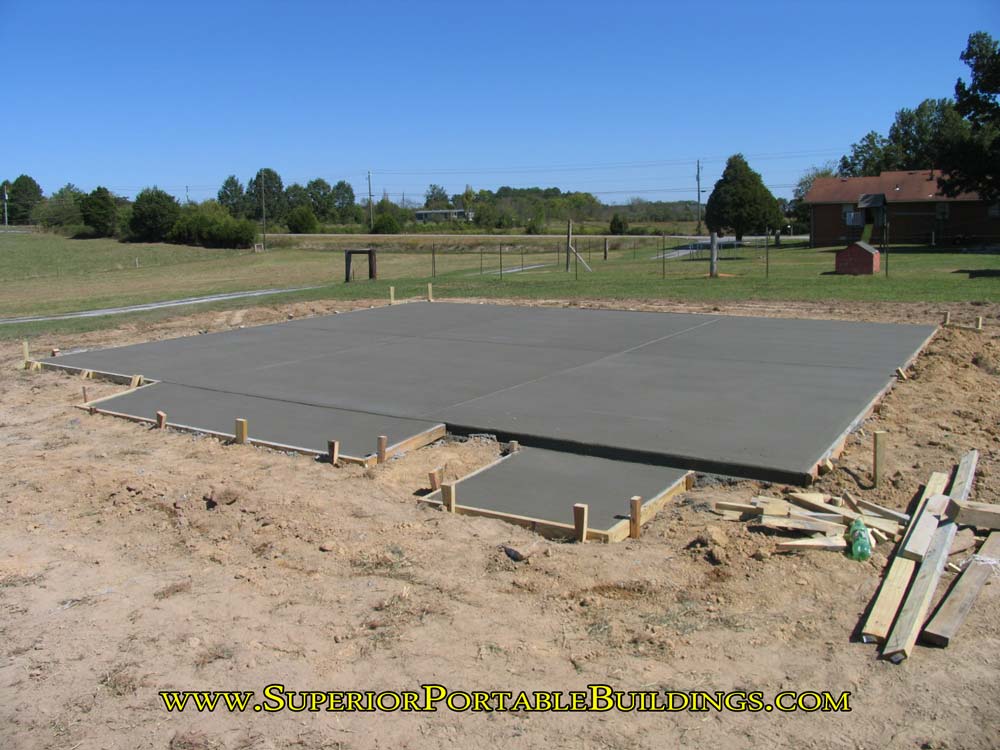
Concrete ramp: A concrete ramp at the garage door(s) should be poured also. Frame one out two or three feet where ever you want the door(s). The steeper the ramp the harder it is for a low car to get in and out. Make the ramp longer for low cars. Maybe even 8' to 10' long if you have a corvette or a low boat trailer.
Concrete type: We normally use 3000 psi concrete with fiber. Concrete that contains fiber can not be finished as smooth as a slab that does not. The fiber will give it a little texture. A special mix is used for concrete that needs to be used in a pump truck. It has smaller gravel so that it will flow better through a hose.
Concrete tools:You will need some special tools to finish up the slab with fiber or not. The list is as follows:
- Bull float and poles.
- Hand floats - 1 per finisher.
- Hand smooth float or trowel 1 - per finisher.
- Hand edger tool.
- Expansion joint tool.
- Pull board - a very straight 12' 2 x 4 board.
- Come along - used to pull concrete.
- Knee boards - used to slide on almost dry concrete.
- Concrete Broom - used on the ramp or slab if rough texture is wanted.
- 5 gallon bucket of water - clean tools and wet broom.
- Power or Gator-aid - as required.
Pouring the concrete: Once the concrete is on the job the clock is ticking. It is drying as soon as it is made. Have the concrete truck add water to the mix. The more water you put the longer it takes to dry. Too much water can weaken the slab. 10 to 20 gallons on a hot day can be right. Wetter concrete spreads easier and is easier to bull float. This is very important on warm to hot days or where the sun is shining on the concrete. I have had as little as 3 yards almost kill me due to the sun, dry concrete and lost time because of hand spreading the concrete.
MAKE SURE TO ADD WATER TO THE CONCRETE!!!!
Before the concrete is poured you need to drive a few wood stakes in the ground about every 8 feet in the center of the slab. Place a nail on side of the stake at the thickness you want the slab to be. Normally 4"s. Pour the concrete and spread it as even as you can. Get the mix just past the stake and stop pouring. Use the hand float and smooth the concrete around the stake at height of the nail. Create a flat level area. This gives you a correct depth point and level area to work from. Your goal is to make the concrete around this stake level with that area. Remove the stake. 2 guys need to take the long straight 2 x 4 board and go from where the stake was to the back wall. Use the board to create a flat line from the edge of the back wall to the level area at the stake. Smooth an area about 2 feet wide. You do this by pulling the concrete towards the side with the board. If the board gets hard to pull move some concrete with the come along. Do not take any concrete from the flat area where the stake was.
This will divide the back of the slab in half roughly. Now one guy needs to move to the corner and the other guy needs to be in the concrete just to the inside of the flat area you just made with the board. One guy will slide the board along the form and the other will attempt to just slide the board over the flat area in the concrete. Moving backwards as you go. "This is called screeding the concrete." You are now pulling the extra concrete towards the truck. The man standing in the concrete has the hardest time. He must push concrete back into his boot marks as he is pulling the board and concrete backwards. If the board is not hitting concrete you need to push in more concrete to bring the level up. Once again, If the concrete builds up and it is hard to move the board, use the come along and pull the extra concrete back towards the truck. We normally have a third man moving concrete in and out as we go. When you divide the slab with stake and board, you break it into smaller sections. Work each section flat moving backwards as you go. Pulling the excess concrete towards the truck. Do not let the truck dump too much concrete too soon. If you don't do this in smaller sections you will be pulling the concrete further and you will tire out faster. If you lose all your strength here you will not be able to finish the slab smooth, it takes a lot of strength to rub concrete smooth. Keep using the board to make your sections level. Once you get away from the back wall form you will need to use the concrete you leveled as the back area to level off of. Keep moving towards the front of the slab. Break it down in to small sections and repeat. Step back from it an look at it from a low level, look for high and low spots in the concrete. Fix them now.
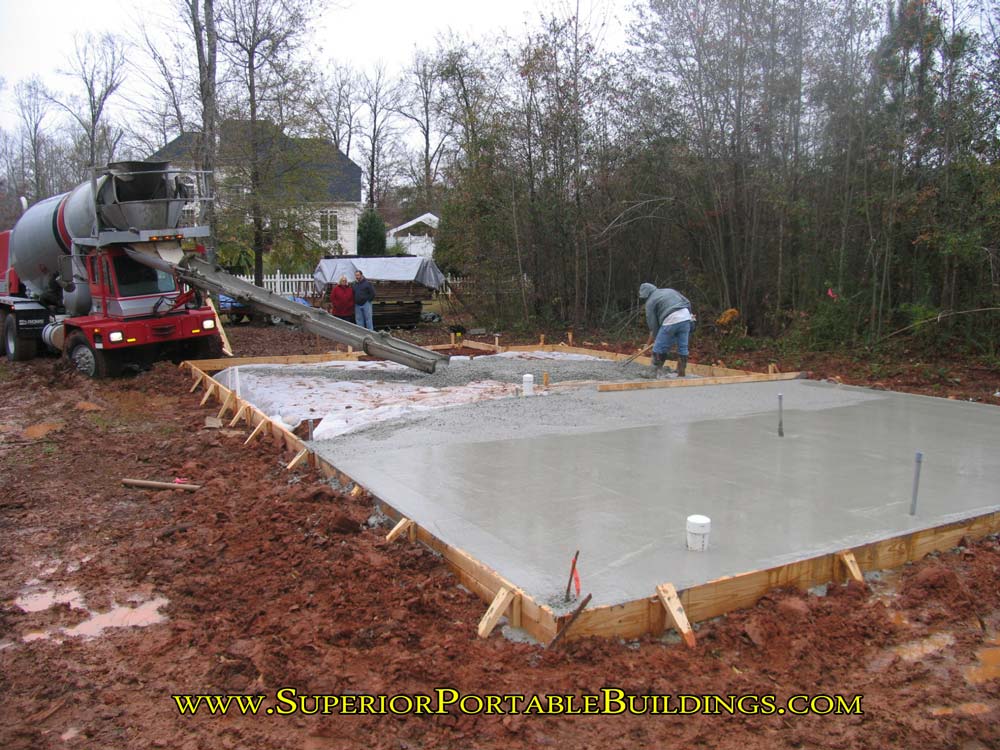
When you get to the front of the slab, put in the form board across the front of the ramp and have the concrete truck wait. Pour the concrete you need to finish up the slab. Use a string line to keep the concrete level and square where the ramp meets the slab. Have the concrete truck wash the concrete out of his shoot and send him on his way. Make sure to get water in your 5 gallon bucket and wash your tools. After the concrete has been pulled and leveled, take the bull float and begin smoothing the concrete. (If it is very hot out a man needs to be doing this while the others get the concrete level.) The other men need to take the hand floats and start smoothing along the forms out as far as you can reach. Smooth the gravel down and bring the wet concrete to the top. Float the slab as level and smooth as you can get it. Try not to leave lines with the concrete bull float. Every line you leave will have to be hand rubbed out later.
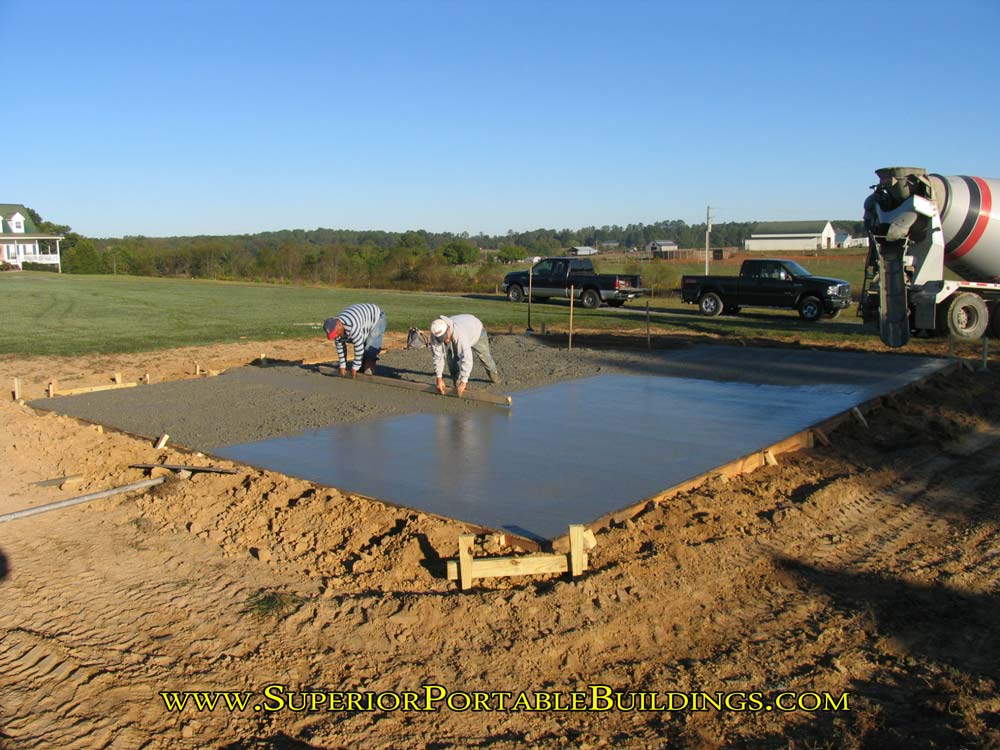
Once the concrete is bull floated smooth, you are waiting for it to get just firm enough to get on it with the knee board sliders and not sink in. We check it with our finger. The concrete will not feel wet. If you were to step on it with your shoes you would sink in still. Normally two to three men will hand smooth at the same time a standard building slab. The knee board sliders allow you to get on wet concrete concrete. You will need a smooth and rough hand trowel, one in each hand and possibly a bottle of water to help wet it, if it is drying to fast. Basically you use the trowels to push yourself along and rub the concrete smooth as you go. Float it level with the rough trowel then you come back over the area with the smooth trowel to give it a nice smooth finished look. This is an art. I do not recommend trying this with out getting a concrete man to show or help you. Always work backwards as you go. You must do the entire slab. One person should be working the edge of the concrete with the edger to give the outside edge a nice finish. Once while the concrete is wet and once again as it gets somewhat dry.

Broom the concrete: Use the concrete broom on the ramp and any driveway. This will help give it texture and it hides rough finishing marks. Most want a smooth building slab. If you want the slab broomed now is the time to do it. You need to broom the concrete soon after you smooth it. If it gets to dry put the broom into the 5 gallon bucket of water. You can also use the water to wash to much wet concrete off the broom.
Concrete Expansion Joints: Most building slabs do not get expansion joints unless it is a really big slab. Driveways normally get one every 10' to 12'. The expansion joint is installed with an expansion joint tool. Mark a straight line across at the location you want the joint. Use the tool and push/beat it in and slide it along the board until the joint is made. This is hard to do if the concrete gets to dry. Do it as soon as you can / when you can put a 2 x 4 on the concrete without it sinking in.
Garage door thresholds: After your building is built you will want to purchase glue down rubber thresholds that go on the inside edge of the garage door. These glue down to the concrete and will prevent water from running in under your door. Garage doors are not water proof and leakage can occur under the doors even if they are shut.
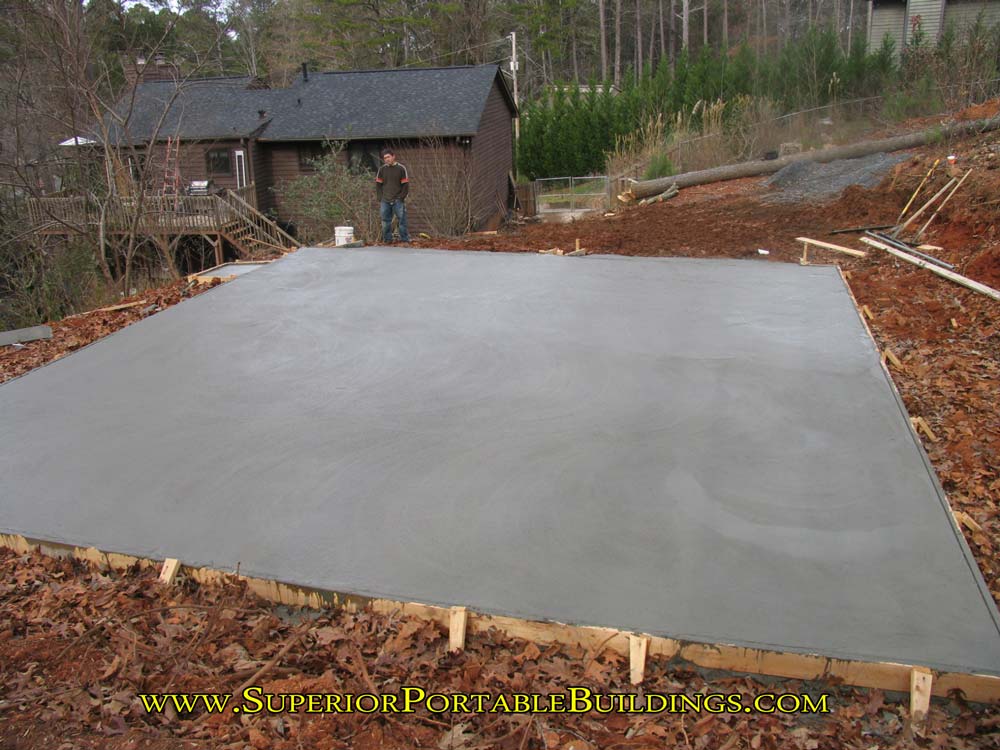
Concrete Sealant: Let the concrete set up a day or two then remove the forms. Your slab will be ready in a week to build on. Buy a 5 gallon bucket of concrete sealant and seal the concrete before you track mud and oil onto the concrete.
If any of you concrete pros, see a mistake in this information, be-sure to drop me a line at sbusa@bellsouth.net. Thanks.
I hope you enjoyed this information on "How to install a concrete slab". If you have any questions about concrete work, give us a call at 770-943-2265. Be sure to send me a gift card for lunch, if you use my information to build your slab. Send it to Bryan at 3080 Powder Springs Road, Powder Springs, Ga 30127. It took me about 4 weeks to put this page together. Thanks and Good luck on your next building project.
No part of this article may be copied, displayed or posted with out the authors prior permission. For permission contact Bryan at sbusa@bellsouth.net.